Automatically map your Attack Surface with results from multiple tools
Get a global view of potential infiltration points an attacker can use, including open ports, running services and software, outdated web technologies, and screenshots.
Automatically created from your tool scan results, the Attack Surface gives you jumping-off points for the next steps in your pentesting engagement.
How automatic Attack Surface mapping works
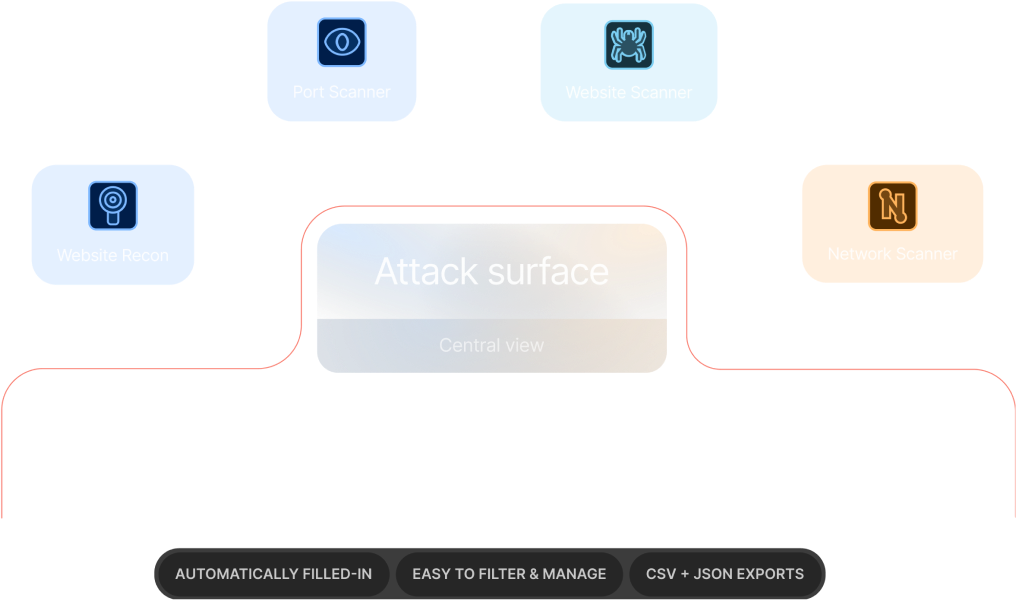
The Attack Surface view aggregates data from these tools:
Launch scans with any of these tools and watch as your Attack Surface auto-fills with crucial details like IP addresses, hostnames, operating systems, open ports, services, technology versions, and screenshots.
And with targets neatly organized in workspaces, you get a comprehensive exposure map for each engagement with zero time spent on manual data compilation.

Key security risks you can diagnose using the Attack Surface

Outdated, exploitable server software
Cause a data breach by exploiting unpatched vulnerabilities.

Open ports (that shouldn’t be publicly accessible)
Reveal sensitive data about the network infrastructure.

Internal network services exposed on the public network
Exfiltrate confidential data by brute-forcing weak passwords.

Old and forgotten web technologies
Gain unauthorized access to sensitive data those web applications process.

6 ways to use the Attack Surface on Pentest-Tools.com
1. Find initial access points attackers can use
Identify infrastructure entry points an attacker might leverage to compromise the target using data about its technology stacks, service versions, and open ports.
2. Prioritize remediation for critical exposures
Identify which parts of the system are most vulnerable (e.g. servers, websites, databases, etc.) and reduce risk through targeted actions (e.g. closing ports, retiring unused services, etc.).
3. Assess how much work a pentest might involve
Scope out your future pentesting engagements and reduce your guesswork. Alternatively, compile more accurate budget proposals for internal projects.
4. Understand how the Attack Surface changes over time
Regular scans with our toolkit keep your Attack Surface up to date and accurate, giving you time to address exposures before attackers notice - and use them.
5. Create, improve, and track effectiveness of security policies
Use insights from the Attack Surface to develop and refine internal security policies, keeping them aligned with the actual risks the organization faces.
6. Manage risk from third-party integrations and services
Understand how third-party integrations and services contribute to the organization’s exposure and find ways to manage and mitigate risks associated with them.

How we make it easier to manage your Attack Surface

See and export all Attack Surface data in a structured format
The Attack Surface groups scan results by asset categories, making it easy to identify old and outdated versions. The option to export it as CSV (table format) or JSON helps push the information further into your workflow.

Zero in on specific exposed and vulnerable components
Visualize and filter technologies currently running on the system (e.g. Wordpress, ASP.NET, PHP, Cloudflare, etc.). Easily drill down into specific components and services to find exposure indicators and high risk areas (e.g. outdated server software, open ports, etc.).

Let everyone contribute to and use the Attack Surface
Grant your team access to a workspace so their actions instantly contribute to the unified Attack Surface. Instead of manually aggregating data from various sources, they can build on each other’s work and make breakthrough findings that drive the project ahead.

Keep the Attack Surface updated with recurring scans
Running a constant cycle of vulnerability scans and automatically enrich and expand your Attack Surface. Maintain accurate, up to date visibility into the most vulnerable parts of the system without tedious manual tasks.
How customers use the Attack Surface
Pentest-Tools.com allows for rapid deployment and automation of many industry-standard security tools; then organizes the results into an easy-to-view attack surface. This allows our penetration testers more time to focus on vulnerability analysis and exploitation.
An added benefit that has been fantastic is that the ease of use allows new employees to add value to an engagement on their first day.
Travis D.
Security Engineering Manager


Developed for..
Pentesters who lack the time to develop their own discovery modules
Network security specialists in charge of security risk assessments
DevOps teams tasked with preventing security gaps in web apps
Developers who understand and manage application security risks
Pentesters looking to preview the scope and work for their future engagements
Business owners with a knack for security as a core performance metric

Attack surface FAQs
What happens if I delete a target?
Moving or deleting a target from your current workspace also deletes all its associated data in the Attack Surface view.
For more details, check out the dedicated article in our Support Center.
Do all the tools on Pentest-Tools.com feed data into the Attack Surface view?
Currently, the following tools generate data for the Attack Surface: Website Recon, the Website Vulnerability Scanner, the TCP Port Scanner, the UDP Port Scanner, the Network Vulnerability Scanner.
We plan to add data for other tools and scanners at Pentest-Tools.com in future iterations. Keep an eye on our changelog, blog, and on our LinkedIn page to be the first to know when we do! You can also explore more details in the dedicated article in our Support Center.
Do API scans appear in the Attack Surface view?
For the moment, the Attack Surface view covers manual scans only from the following tools: Website Recon, the Website Vulnerability Scanner, the TCP Port Scanner, the UDP Port Scanner, the Network Vulnerability Scanner.
Through API scans, you can feed findings and results from our tools into your own version of an attack surface (e.g. dashboard or app), which is why you won’t see them in this view on Pentest-Tools.com.
How do I analyze my Attack Surface?
The data in your Pentest-Tools.com dashboard can help you with 2 out of 3 key steps that reduce your network attack surface.
Use the Attack Surface view to identify assets and the most exposed entry points an attack could exploit to breach the network (step 1).
Eliminate unnecessary pathways and run recurring scans with tools on our platform to validate that your network's attack surface was reduced. Analyze the same results to identify new open ports or outdated services, among other types of relevant data (step 2).
Best practices recommend network segmentation as step 3, to further minimize a network's attack surface.
For in-depth information about the topic, check out OWASP’s cheat sheet.
How do I reduce my Attack Surface?
Attack surface reduction principles include patching, shutting down unnecessary services and network ports, reducing the amount of code running, setting strong trust boundaries, security awareness training for employees, and more.
For in-depth information about the topic, check out this guide from Infosec Institute.
Attack Surface reduction vs vulnerability management - what is the difference?
Vulnerability management is a constant cycle of identifying, classifying, prioritizing, remediating, and mitigating software vulnerabilities (software weaknesses).
Attack surface reduction aims to decrease the number of exposed open ports and services (network and system weaknesses), resulting in less vulnerabilities and limiting the ability of malicious actors to perform attacks.
Both vulnerability management and surface attack reduction have a shared goal: reducing risk by making the environment more secure.
Learn more about how attack surface reduction helps in vulnerability management in our dedicated guide.